


Twitter offers multiple tools to let you increase your influence area, and reach the communities you are interested in. Twitter has become the go-to social media platform for businesses, mainly because of its reach, and infinite engagement opportunities. As Twitter continues to grow and users get more from it, it’s important to make sure you’re properly positioning yourself.
In order to give twitter a better use, it is helpful to have a program to send tweets, so we can automate part of our work in social media.
On this post, we are going to learn how to send a tweet using twitter API v2 and python.
It is important for you to know, that twitter has a space for developers where you can find apps and ideas on how to improve your skills using the twitter platform. You can find it here
Before we start
1. Create twitter developer account
Sign up for Twitter Developer Account through the following link developer.twitter.com/en/apply-for-access
Input the requested information, and await for your mail confirmation.
Once confirmed, click on Create an App option.
Fill in any necessary data, to generate the secret key and access tokens
Store the keys on a safe place.
2. Handling secret keys
Once you have your secret keys, there are different ways to safely handle them. Here I present two of them:
- Using environment variables:
This strategy will keep your secret keys outside your python code. In your terminal, set your environment variables by running the following lines of code:
    export 'CONSUMER_KEY'='YOUR_CONSUMER_KEY'
    export 'CONSUMER_SECRET'='YOUR_CONSUMER_SECRET'
Then, from inside python, you insert the following code:
    consumer_key = os.environ.get("CONSUMER_KEY")
    consumer_secret = os.environ.get("CONSUMER_SECRET")
- Using a config file:
Create a config.py file in the same folder as your project, and in there you write
    consumer_key = 'YOUR_CONSUMER_KEY'
    consumer_secret = 'YOUR_CONSUMER_SECRET'
Then, from inside your python file, you insert the following code:
    import config
    consumer_key = config.consumer_key
    consumer_secret = config.consumer_secret
3. Authorize the App
We created a function that allows you to authorize the App to send tweets from your account. This step must be taken in order for the App to work.
def create_verifier():
    """
    This function will create a verifier
    It needs to be run when we first try to send a tweet, or when credentials have changed.

    :return: oauth, fetch_response, verifier
    """

    # Import authorization library
    from requests_oauthlib import OAuth1Session
    import config

    # Use pre-assigned credentials
    consumer_key = config.consumer_key
    consumer_secret = config.consumer_secret

    # Create auth object
    oauth = OAuth1Session(consumer_key, client_secret=consumer_secret)

    # Get request token
    request_token_url = "https://api.twitter.com/oauth/request_token?oauth_callback=oob&x_auth_access_type=write"

    try:
        fetch_response = oauth.fetch_request_token(request_token_url)
    except ValueError:
        print(
            "ValueError when trying fetch_response for authentication. Please verify you correctly introduced the consumer_key and consumer_secret."
        )

    # Get authorization
    base_authorization_url = "https://api.twitter.com/oauth/authorize"
    authorization_url = oauth.authorization_url(base_authorization_url)
    print(f"Please click here and authorize the App: {authorization_url}")
    # Now write the code you received in here:
    verifier = input("Paste the PIN here: ")

    return oauth, fetch_response, verifier
When you click on the requested link to authorize the App, you will see a screen like the next one:
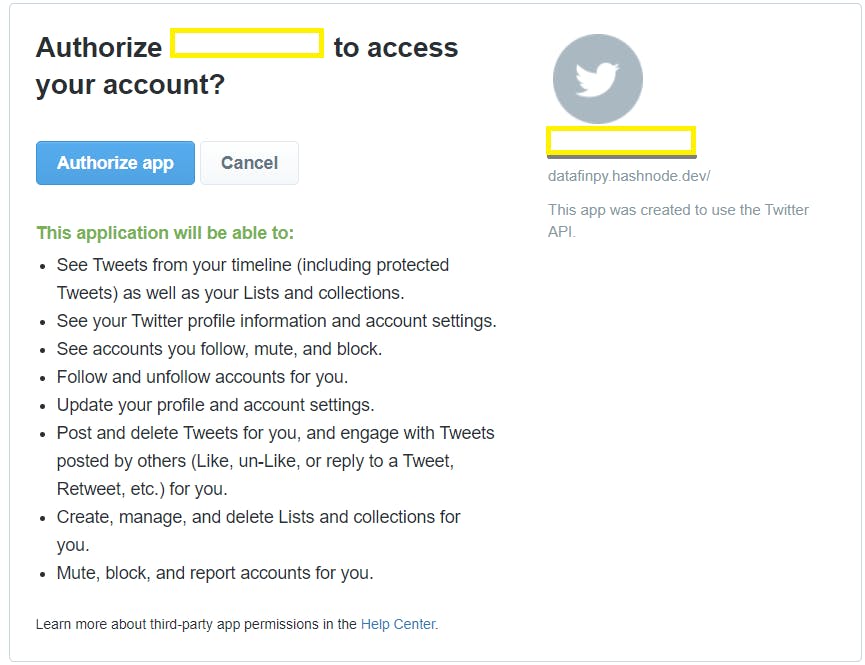
In the yellow squares, you will see the name of the App trying to get authorization. Also the data of the twitter account will change. Click on "Authorize app" and input the seven digits code when prompted by the python program.
4. Send a tweet
We are finally here. To send a tweet, we create a send_tweet function, which uses the code we created on step 3.
def send_tweet(message=None):
    """
    Follows the twitter developer code on github to send a tweet
    https://github.com/twitterdev/Twitter-API-v2-sample-code/blob/main/Manage-Tweets/create_tweet.py
    :return:
    """
    from requests_oauthlib import OAuth1Session
    import json

    # Use pre-assigned credentials
    consumer_key = config.consumer_key
    consumer_secret = config.consumer_secret

    # Default text message. Write here the message to send
    if message is None:
        message = 'Hi! I hope you have a rewarding day. Write some code and have fun!'

    payload = {"text": message}

    oauth, fetch_response, verifier = create_verifier()

    resource_owner_key = fetch_response.get("oauth_token")
    resource_owner_secret = fetch_response.get("oauth_token_secret")

    # Get the access token
    access_token_url = "https://api.twitter.com/oauth/access_token"
    oauth = OAuth1Session(
        consumer_key,
        client_secret=consumer_secret,
        resource_owner_key=resource_owner_key,
        resource_owner_secret=resource_owner_secret,
        verifier=verifier,
    )
    oauth_tokens = oauth.fetch_access_token(access_token_url)

    access_token = oauth_tokens["oauth_token"]
    access_token_secret = oauth_tokens["oauth_token_secret"]

    # Create the object to make the request
    oauth = OAuth1Session(
        consumer_key,
        client_secret=consumer_secret,
        resource_owner_key=access_token,
        resource_owner_secret=access_token_secret,
    )

    # Making the request to post the tweet
    response = oauth.post(
        "https://api.twitter.com/2/tweets",
        json=payload,
    )

# Handle exception
if response.status_code != 201:
        raise Exception(
            "Request returned an error: {} {}".format(response.status_code, response.text)
        )

    print("Response code: {}".format(response.status_code))

    # Saving the response as JSON
    json_response = response.json()
    print(json.dumps(json_response, indent=4, sort_keys=True))
When we print the json_response, we can see the tweet id.
5. Credits
Article image by OpenClipart-Vectors from Pixabay
Conclusion
We used python and twitter API v2 to send a tweet. If we combine it with a scheduler program, we will be able to pre-program our tweets, based on our agenda and on the best times to send tweets, so we can reach the most of our target audience.
Have fun coding!